

Model Extent Parameters#
If the aim is to create a synthetic model, no input datasets are required although a digital elevation model (DEM) can be used to provide the surface and locality of the synthetic model. When modelling observed data, the first step is to import the datasets that will be used for the modelling. In this example we will use magnetic, gravity and DEM data, and we also have an RGB image of the area’s geology.
It is important to ensure the following:
All datasets must be projected (not in geographic coordinates) and they must be in the same projection. To check the projection of each dataset, look at the raster’s metadata.
Ensure that the band names are distinct and that they clearly identify the type of data. This can be changed by accessing the raster’s metadata.
If you use magnetic data, make sure that it is not total magnetic intensity data. The IGRF must be removed.
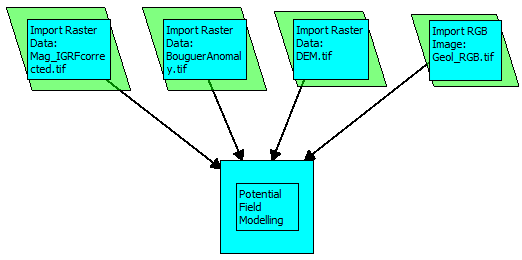
Example of importing datasets and linking them to the Potential Field Modelling module.#
When selecting the Model Creation and Editing menu option, the Potential Field Modelling module will appear in the main PyGMI window. Connect the imported rasters to this module and double-click on it. This brings up the Model Extent Parameters dialog box with the following options:
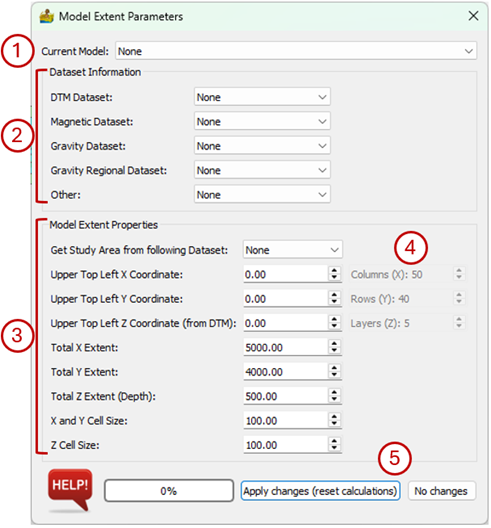
Model Extent Parameters interface with no datasets assigned.#
Current Model - This shows the name of an imported model. Since we are creating a model from scratch no model name will be displayed.
Dataset Information:
DTM Dataset - This is a Digital Terrain Model (DTM) or DEM of the modelling area. If you are modelling actual data, this is compulsory. If nothing is available, you can download the Shuttle Radar Topography Mission (SRTM) data from NASA (https://www.earthdata.nasa.gov/). It is not necessary if you are merely doing a theoretical model of, say, a dyke.
Magnetic Dataset - The magnetic data to be modelled.
Gravity Dataset - The gravity data to be modelled.
Gravity Regional Dataset - This is a gravity regional dataset used to apply a regional correction to the gravity data. For large models that extend to great depths, it is convenient to model the deep-seated material as a separate model that has a much larger extent than the modelling area to eliminate edge effects. The response of this regional model can be saved to a raster dataset and imported to be added to the gravity response of the model.
Other - Here you can add an additional layer for comparison purposes, for example a GeoTIFF of the geological map.
Model Extent Properties - This controls the area size and depth of your model, as well as its resolution. The following settings can be specified:
Get Study Area from the following Dataset - If data were imported into the model, the dataset that defines the study area can be selected.
Upper Top Left X Coordinate -The north-west corner X coordinate of the model in metres.
Upper Top Left Y Coordinate - The north-west corner Y coordinate of the model in metres.
Upper Top Left Z Coordinate - The north-west corner Z coordinate of the model in metres above sea level.
Total X Extent - The distance in metres from east to west in the model.
Total Y Extent - The distance in metres from north to south in the model.
Total Z Extent (Depth) - The depth range in metres of the model.
X and Y Cell Size - The width of each model cube in the X and Y direction (in metres).
Z Cell Size - The height in metres of each model cube in Z direction.
The number of cells/voxels in the model with the specified extent parameters:
Columns (X) - The number of columns automatically calculated from the extents and cell sizes.
Rows (Y) - The number of rows automatically calculated from the extents and cell sizes.
Layers (Z) - The number of layers automatically calculated from the extents and cell sizes.
Apply changes (reset calculation) - Apply any changes in the model extent parameters to a model. It must be done when a model is created for the first time or if any of the model parameters were changed.
The imported datasets can now be assigned to the datasets under Data Information. Make sure to connect the correct raster to the correct dataset. Under the Model Extent Properties, select the dataset that will be used to define the modelling area. The model coordinates and X and Y extents will be update automatically based on the selected dataset. The user selects the desired Z extent and cell sizes. Note that the top left X, Y and Z coordinates and the X and Y extents can be manually changed if you want to change the modelling area, but the area must be within the extent of the DTM that you loaded.
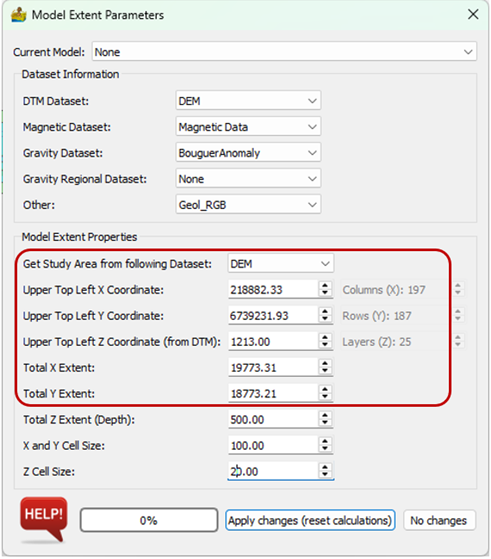
Model Extent Parameters interface after the DEM was selected to define the modelling area. the parameters in the red block update automatically.#
Tip
Start with a low-resolution model to get a general model in place first. 20 x 20 x 20 should be fine, since any bigger will get slow to model.
Once your low-resolution model is complete, you can increase the model’s resolution to a better resolution. Please note that bigger than 100 x 100 x 100 will cause calculations to become very slow (unless you have adequate memory).